Overview: Flex Processor Rules Manager
The Flex Processor in eCapture is used in standard Data Extract and Process jobs to both determine and perform document filtering. Rules help to cull and manage large data collections. Rules created within the Flex Processor contain actions, criteria and scope for specific document handling.
Using the Flex Processor Rules Manager you can set up specific Actions to be applied when processing a job. These Actions assist you in efficiently removing
non-responsive files, which results in a smaller data collection.
You can easily modify rules to adjust the criteria, change the order that rules are applied, remove rules, etc. Rules can be reapplied multiple times until the desired results are achieved.
Flex Processor Basics
The Flex Processor uses a list of rules to define how documents are processed based on both document criteria and scope. This list of rules acts as a funnel where each document selected for processing will be compared to each rule in the list in the order that the rules are listed. If the document meets the criteria, it is marked as a rule hit. Flex Processor Rules are used to filter data and take action on data to make large data collections more manageable.
When rules are applied, the system takes action on the documents in the data collection. Only one Action is allowed per rule. The following diagram depicts
flex processor rule criteria (document selection, multiple criteria options)
as it pertains to an action: process, placeholder, or remove. Rules may be re-ordered
in the list to affect the outcome. Select documents into the results set
before removing them. Typically “include” actions are at top while “exclude”
(remove) actions are at the bottom.
Each rule is executed on
every single document in the order in which they were defined and each rule
is an “OR” in the rules list.
- If you select two or more criteria for your rule, the rule used the "AND" Boolean logic. Criteria options includes:
date range, search terms, file types, file extensions, file size, ItemIDs/ItemGUIDs,
Hash/NIST list, de-duplication (Job, Custodian, Case (Project), Client
levels).
- The document is given to
each rule. If it fits the criteria, it is marked as a rule hit.
- There
may be multiple rule hits, but only one final action.
- There may be cases where
one Rule may contradict another Rule, but this will not impact the overall
process because the last Rule to “touch” the file will be the Effective
Rule.
- The Effective Rule determines
how a document will be processed.
- There is no limit in the
number of Rules that can be created.
For example, suppose you create rules in the following order: Image, Placeholder, and Remove. In the Rule List, at the top of the Flex Processor Rules Manager dialog, the Image rule is listed first and the Remove rule is listed last. eCapture
applies the remove rule first, then applies the placeholders, and finally images only the remaining files when the Job is started.
It is crucial that
you have a clear understanding of the order in which the rules will be applied. It is important to understand how each rule
can affect the results as it is applied so that you can achieve
the correct results.
The sections below:
- Provide detailed information about the key components of rules
- Explain how to define rules
- Explain how to preview rules before they are applied
- Provide an example of a rule set and explain the order in which the rules are applied
- Explain the buttons and options on the Rule Bar
Click on the section titles to view the detailed information.
A rule is comprised of three main components: an Action, a set of Criteria, and a Scope for applying the rule.
- Action - The action to be taken on the documents that meet the criteria. Only one Action is allowed per rule.
- Criteria - Determines which files this action applies to.
-
Scope - Specifies how the rule is applied to the files that meet the specified criteria.
Actions
A core part of the rule definition is the Action. The Actions available to be taken on the data in the collection vary depending on whether you are creating a rule at the Case (Project) Level, or for a Processing Job or Data Extract Job.
Case (Project) Actions
- Produce
- Placeholder
- Remove
Processing Job Actions
- Image
- Convert to PDF
- Placeholder - A placeholder is created but no document text is extracted
- Placeholder with Document Text - Document text is extracted while an image placeholder is created
- Remove
Data Extract Actions
- Data Extract
- Text Placeholder
- Remove
Criteria
The Flex Rule Processor can identify documents based on the following criteria:
- All documents
- Duplicates
- file types
- file extensions
- file size
- date range
- keyword/field searches (dtsearch index required, this is generated during discovery)
- ItemIDs
- ItemGuids
- Email entry IDs
- NIST matches
- Custom Hash list matches
- Parent or child ItemID lists
Scope
There are several different options for specifying the scope (how the rule is applied). The Flex Rule Processor can:
- Apply the rule to all items in a family if the parents match
- Apply the rule to all items in a family if at least one item matches
- Apply the rule to all items in a family if ALL items match
- Treat the items in a family separately
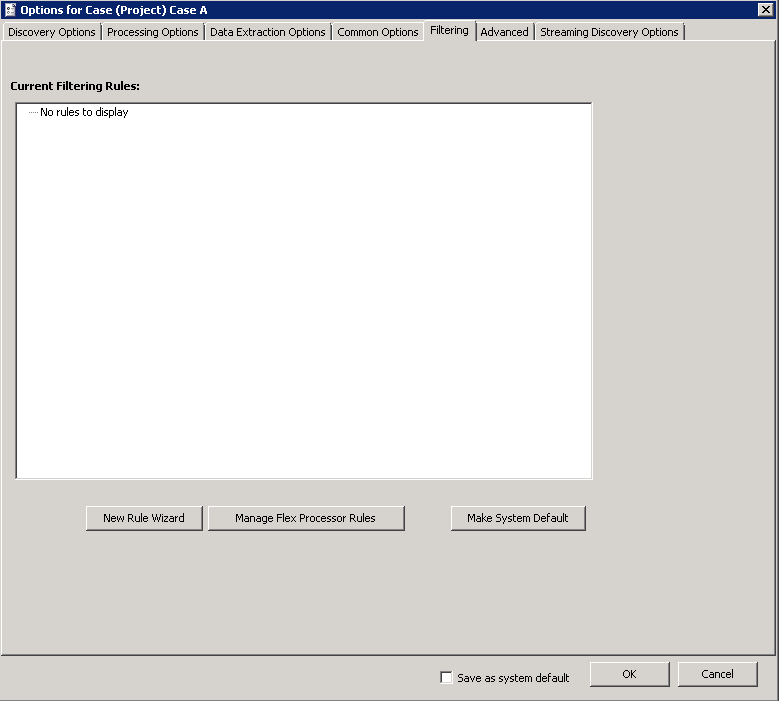
There are two ways that you can create individual rules. When you create a Case (Project) you set the options for the Case (Project). Similarly, when you create a Processing Job or Data Extract Job you set the options for the job. In both cases, one of the option tabs available at the time of Case (Project) or Job creation is the Filtering tab.
On the Filtering tab, you can create new rules using either the:
-
Flex Processor Rules Manager Wizard - The wizard walks you through each step of the rule creation process. On the Filtering tab, click on the  button, the New Rule Wizard displays. You set the General settings for the rule and click Next to progress through the wizard to create your rule.
For more information about creating rules using the New Rule Wizard, see Create Rules By Using the Flex Processor Rules Manager Wizard.
-
Flex Processor Rules Manager Dialog - The Rules Manager Interface is accessible from the Filtering tab. On the Filtering tab, click on the  button. The Flex Processor Rules Manager dialog displays. You create new rules by clicking on the New Rule button and setting General, Date, Search, and Advanced criteria for the rule. In the Rules List, at the top of the dialog, you can reorder the rules you created. This impacts the order in which the rules will be applied.
For more information about creating rules using the Flex Processor Rules Manager Dialog, see Create Rules By Using the Flex Processor Rules Manager Dialog Box.
|

|
Note: You can also view the Flex Processor Rules for a selected job. When
viewing the Status and Summary Panel for a selected Processing Job or Data Extract
Job in the Client Management treeview, click  to view the settings. If the Job started, you cannot modify the options.
|
The rules that you have created for your Case (Project), Processing Jobs, or Data Extract Jobs can be managed in aggregate. This enables you to manage entire rule sets. The
Rule Set Management Wizard is available at the Case (Project), Processing
Job, and Data Extract Job levels. Using the Rules Set Management Wizard you can:
- Import or create new rules
- Export or copy rules
- Define master rule sets
- Delete all rules from your current job/case (project)
For more information on the Rule Set Management Wizard, see Manage Rules Sets Using the Rule Set
Management Wizard.
Use the Flex Processor Results Summary Report to view the Total Rule Hit and Effective Rule Hit summaries for each rule in a single job along with an Action Summary that reports on total item counts for each action configured for the job.
- Total Rule Hit - These numbers reflect the amount of items (documents) that qualified for each rule.
- Effective Rule Hit - These numbers reflect the exact number of items that each rule was applied to.
Before you run a job, you can:
Click the Apply Rules button, above the jobs list.
Select the specific Processing or Data Extract job you want to view the Flex Processor Summary Report for. The selected job will run but will only apply the rules and not perform any of the rule Actions. Once the rule application is completed, the job will go back to an ‘Unstarted’ status with the job circle icon now showing as blue.
In the Client Management treeview, right-click on the job and select Reporting > Flex Processor Results Summary.
Review the numbers on each rule and determine if the rules need to be reconfigured or not prior to running the job.
|
|
Note: De-duplication occurs on the fly. The numbers will not be accurately reported for this type of rule in the Flex Processor Results Summary Report until the job is run to completion.
|
Rules are displayed in the Rule List as follows:
Rule ID: Action -- Rule Title -> Criteria: Criteria Specified.
Certain rules will not feature all components. For instance, in the image below (click on the thumbnail to expand the image), the top rule (46: Image -> All files) does not contain a rule title or specified criteria, whereas the rule directly below it (47: Placeholder with Document Text -- placeholder spreadsheet -> File types: Microsoft Excel, Spreadsheet) contains each component.
The image above depicts a typical set of rules. The rules are applied based on the order they are listed in the Rules List. In this example, the Flex Rule Processor:
- Removes duplicate files detected at the Case (Project) Level.
- Removes files in the data collection that are not relevant to subset of data you want to process.
- Inserts a Placeholder for any media files encountered in the data collections (.FLV, .MOV, .MP3, .MP4, and .WAV files).
- Adds a placeholder with document text for spreadsheets (.XLS files)
- Images all of the remaining files in the data collection and creates a placeholder. Based on the scope setting, it applies the rule to all items in a family if the parent files match.
About De-Duplication Rules
De-duplication is the process
of identifying and separating identical electronic documents based on
the MD5 hash value of each document, either at the client, custodian,
case (project), or processing job level. The MD5 hash value is analogous to an electronic fingerprint. Each document has a hash value and documents originated from the same source document (children of parent documents) share the same hash value.
|
|
Note: Typically, you place de-duplication rules
at the bottom of the Rules List.
|
Using the Flex Processor Rules Manager Rule Bar, you can create New Rules, Save Rules, Discard
Changes made to rules, Delete Rules, Preview the Results of the Rules,
Access the Rule Set Manager Wizard, open a Help popup window, and Exit the Flex Processor
Rules Manager.
|
|
Note: The  icon indicates that there is additional information available that describes a specific field or section on the Flex Processor Rules Manager dialog. Click the icon to view additional information about the option. icon indicates that there is additional information available that describes a specific field or section on the Flex Processor Rules Manager dialog. Click the icon to view additional information about the option.
|

 : This button activates
the Rule for criteria selection. If the down arrow is clicked to the right
of the New Rule button, two options appear: New Rule and New Search-In-Results
Rule.
: This button activates
the Rule for criteria selection. If the down arrow is clicked to the right
of the New Rule button, two options appear: New Rule and New Search-In-Results
Rule.
- New Rule is used to create a new rule, one which is not dependent
on any other rules. This is the default.
-
Search-In-Results Rule
is used to create a new rule that is dependent on one or more selected
rules. Search-In-Results rules allow for refined filtering scenarios. For example, Rule1 will select all documents with the
responsive term “criminal”, and then SubRule1 will search within Rule1
to placeholder Excel documents with the responsive term “money”. Essentially,
Excel documents with the words “criminal” and “money” will be placeholdered.
The Search-In-Results Rule Options
are:
-
Applies
to Results of All Previous Rules - The “catch-all” rule for all documents
selected by upper rules. Example: placeholder unknown file types.
-
Applies
to Results of Selected Rule - Refined criteria/action for only documents
fitting criteria of selected “parent” rule. Example: keyword search
on documents in a date range.
|
|
Note: The above option is not available if the selected rule is a de-duplication
rule. In addition, de-duplication options will not be available when
creating a rule that is one of these child rules.
|
Caveats for Search-in-Results Rule Options
are:
-
 : This button
saves the Rule.
: This button
saves the Rule.
-
 : This button
evokes a confirmation dialog asking if you want to discard the changes
made for the selected Rule in the Rules List.
: This button
evokes a confirmation dialog asking if you want to discard the changes
made for the selected Rule in the Rules List.
-
 : This button
evokes a confirmation dialog asking if you want to remove the selected
Rule in the Rules List.
: This button
evokes a confirmation dialog asking if you want to remove the selected
Rule in the Rules List.
-
 : Initially
will display a rule application status bar on top of the Flex Processor
dialog’s title bar. For large rule sets, the rule application status bar
will remain for several seconds to show the status of rules applied.
(Note: If necessary, click Cancel to return to the Flex Processor dialog
and to cancel the rule application.) The Flex Processor Preview dialog
appears after the rule application status bar closes and applies each
Rule to the data collection. The Flex Processor Preview displays an Item
level report for the Rules as well as the number of Records. Use this
Preview to verify the accuracy of the Rules and their desired results.
The following screen shot shows the Preview fields.
: Initially
will display a rule application status bar on top of the Flex Processor
dialog’s title bar. For large rule sets, the rule application status bar
will remain for several seconds to show the status of rules applied.
(Note: If necessary, click Cancel to return to the Flex Processor dialog
and to cancel the rule application.) The Flex Processor Preview dialog
appears after the rule application status bar closes and applies each
Rule to the data collection. The Flex Processor Preview displays an Item
level report for the Rules as well as the number of Records. Use this
Preview to verify the accuracy of the Rules and their desired results.
The following screen shot shows the Preview fields.
These results can be saved
to a .CSV file for distribution.
-
 : The Rule
Set Manager button activates the Rule Set Management Wizard.
: The Rule
Set Manager button activates the Rule Set Management Wizard.
-
 : This button evokes
a single dialog that gives an example for setting a Rule. Throughout the
Flex Processor Rules Manager, you will see a blue icon question mark icon appear as you mouse over
(or near) different options. Click to display
a pop up with information about the options.
: This button evokes
a single dialog that gives an example for setting a Rule. Throughout the
Flex Processor Rules Manager, you will see a blue icon question mark icon appear as you mouse over
(or near) different options. Click to display
a pop up with information about the options.
-
 : Exits the Flex Processor
Rules Manager. However, if any files were not produced, a dialog appears
stating so and asking for a decision.
: Exits the Flex Processor
Rules Manager. However, if any files were not produced, a dialog appears
stating so and asking for a decision.
-
 : Displays
the number of the Rule selected, Rule n, where
n represents the number of the
Rule (e.g. Rule 12).
: Displays
the number of the Rule selected, Rule n, where
n represents the number of the
Rule (e.g. Rule 12).
Related Topics
Create Rules By Using the Flex Processor Rules Manager Dialog Box
Create Rules By Using the Flex Processor Rules Manager Wizard
 Rule Actions, Criteria, and Scope